Configuration of fault-tolerant NFS share storage for VmWare by using GLUSTERFS
Introduction.
We are using glusterfs more then one year. One of applications of this solution is NFS storage for VmWare.
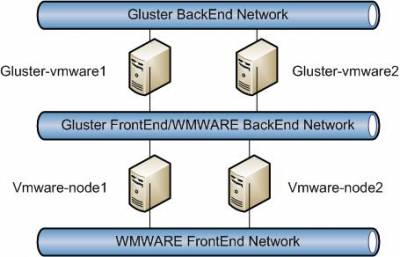
Scheme.
| Scheme | Descriptions |
 | 1.hardware configuration: 2 CPU Xeon E5410/DDR2 8GB/RAID Promise/2 HDD SAS 15k 300GB/2 HDD SAS 15k 600GB/2xEthernet 1Gbit 2xports
(RAID configuration - RAID1 - mirror)
2.network configuration: Each network is served by two switchs (stack). Each gluster server is connecting to two switches of each network
3.networks addressing:
gluster backend network (GBN) - 172.18.0.0/24
gluster frontend network (GFN) - 10.255.254.0/24
4.gluster servers IP addressing:
glustre-vmware1 - GBN:172.18.0.1,GFN:10.255.254.1
glustre-vmware2 - GBN:172.18.0.2,GFN:10.255.254.2 |
Deploying and basic configuration
Further, I will not describe process of configuration and process of configuration OS in details.
1. Install Linux Centos 6.3 x64 on the 300GB raid disk.
Format (ext3) and mount 600GB raid disk as /big. (use UUID identifier for /etc/fstab mount)
Make directory - /small
2. Configure network.
Create two bonds intefaces mode=6 ALB
echo "alias bond0 bonding" >> /etc/modprobe.d/bonding.conf
echo "alias bond1 bonding" >> /etc/modprobe.d/bonding.conf
Configure interfaces (only one interface example)
cat /etc/sysconfig/network-scripts/ifcfg-bond0
DEVICE="bond0"
BOOTPROTO="static"
ONBOOT="yes"
IPADDR=172.18.0.1
NETMASK=255.255.255.0
TYPE="bond"
BONDING_OPTS="miimon=100 mode=6"
cat /etc/sysconfig/network-scripts/ifcfg-eth0 (for ifcfg-eth1 the same)
DEVICE="eth0"
BOOTPROTO="none"
ONBOOT="yes"
SLAVE="yes"
TYPE="ethernet"
MASTER="bond0"
3. Install software
cd /etc/yum.repos.d/
wget http://download.gluster.org/pub/gluster/glusterfs/3.3/3.3.1/CentOS/glusterfs-epel.repo

mkdir /backup
cd /backup
wget http://mirror.yandex.ru/epel/6/x86_64/epel-release-6-8.noarch.rpm
rpm -i epel-release-6-8.noarch.rpm

yum update
yum install mc htop blktrace ntp dstat nfs glusterfs* pacemaker corosync openssh-clients
4. Disable Selinux
cat /etc/selinux/config
# This file controls the state of SELinux on the system.
# SELINUX= can take one of these three values:
#     enforcing - SELinux security policy is enforced.
#     permissive - SELinux prints warnings instead of enforcing.
#     disabled - No SELinux policy is loaded.
SELINUX=disabled
# SELINUXTYPE= can take one of these two values:
#     targeted - Targeted processes are protected,
#     mls - Multi Level Security protection.
SELINUXTYPE=targeted
5. Flush iptables. (All accept)
6. Configure service to start at boot
chkconfig ntpd on
chkconfig glusterd on
chkconfig corosync on
chkconfig pacemaker on
6. Reboot servers
Configuration of services
1. Configure hosts:
echo "172.18.0.1" gluster-vmware1" >> /etc/hosts
echo "172.18.0.1" gluster-vmware2" >> /etc/hosts
2. Configure ntpd
3. Configure GLUSTERFS (using server gluster-vmware1)
gluster peer probe gluster-vmware2
gluster volume create small replica 2 transport tcp gluster-vmware1:/small gluster-vmware2:/small
gluster volume create big replica 2 transport tcp gluster-vmware1:/big gluster-vmware2:/big
gluster start small
gluster start big
Confirm that the volume has started using the following command:
gluster volume info
Configure NFS access
gluster volume set small nfs.rpc-auth-allow <comma separated list of addresses or hostnames of vmware nodes to connect to the server>
gluster volume set big nfs.rpc-auth-allow <comma separated list of addresses or hostnames of vmware nodes to connect to the server>
4. Configure corosync
On both gluster servers
cat /etc/corosync/corosync.conf
compatibility: whitetank
totem {
      version: 2
      secauth: on
      threads: 0
      interface {
              ringnumber: 0
              bindnetaddr: 10.255.254.N # where N is IP address of front end network
              mcastaddr: 226.94.1.1
              mcastport: 5405
              ttl: 1
      }
}
logging {
      fileline: off
      to_stderr: no
      to_logfile: yes
      to_syslog: yes
      logfile: /var/log/cluster/corosync.log
      debug: off
      timestamp: on
      logger_subsys {
              subsys: AMF
              debug: off
      }
}
amf {
      mode: disabled
}
cat /etc/corosync/service.d/pcmk
service {
      # Load the Pacemaker Cluster Resource Manager
      name: pacemaker
      ver:  1
}
END
Create authkey on one server and copy it to another server.
corosync-keygen.
Restart services
service corosync restart
service pacemaker restart
Check
crm status
Last updated: Fri Jan 11 09:31:55 2013
Last change: Tue Dec 11 14:33:11 2012 via crm_resource on gluster-vmware1
Stack: openais
Current DC: gluster-vmware1 - partition with quorum
Version: 1.1.7-6.el6-148fccfd5985c5590cc601123c6c16e966b85d14
2 Nodes configured, 2 expected votes
============
Online: [ gluster-vmware1 gluster-vmware2 ]
5. Configure pacemaker
crm
crm(live)#
crm(live)#configure
crm(live)configure#
crm(live)configure#crm configure property no-quorum-policy=true
crm(live)configure#crm configure property stonith-enabled=false
crm(live)configure#primitive FirstIP ocf:heartbeat:IPaddr2 params ip="10.255.254.30" cidr_netmask="24" op monitor interval="30s" on_fail="standby"
crm(live)configure#commit
Tunning
OS:
cat  /etc/sysctl.conf
# increase Linux TCP buffer limits
net.core.rmem_max = 8388608
net.core.wmem_max = 8388608
# increase default and maximum Linux TCP buffer sizes
net.ipv4.tcp_rmem = 4096 262144 8388608
net.ipv4.tcp_wmem = 4096 262144 8388608
# increase max backlog to avoid dropped packets
net.core.netdev_max_backlog=2500
net.ipv4.tcp_mem=8388608 8388608 8388608
GLUSTER:
gluster volume set big nfs.trusted-sync on
gluster volume set small nfs.trusted-sync on
Testing
1. Mount partitions to vmware nodes.
2. Creation of testing VM
We have deployed VM win7 x86 with thick disk 40GB. Also we have installed Performance Test on the VM
3. Results of tests
| gluster nfs.trusted-sync parameter | tests results |
| off |  |
| on |  |
PS.
On experience with gluster I advise to use three node like more stable solution.
With this case don't forget to set for pacemaker:
crm configure property no-quorum-policy=false
for gluster:
gluster volume set VOLUMENAME cluster.quorum-count 2
Centos/Redhat 6.4
Today i have updated the system to centos 6.4.
Crm configuration command disappeared.
If you want to use crm configuration command with centos/redhat 6.4 you need to install crmsh: yum install crmsh
I'm using follow repo
[network_ha-clustering]
name=High Availability/Clustering server technologies (RedHat_RHEL-6)
type=rpm-md
baseurl=http://download.opensuse.org/repositories/network:/ha-clustering/RedHat_RHEL-6/
gpgcheck=1
gpgkey=http://download.opensuse.org/repositories/network:/ha-clustering/RedHat_RHEL-6/repodata/repomd.xml.key
enabled=1
Or you can use pcs (yum install pcs)
About author


